

According to a study, professionally photographed homes sell 32% faster. Real estate photography can be a great tool in your marketing strategy.
90% of home buyers start house hunting online. Photos help home buyers envision themselves in your house and may help you sell your property faster.
What is Real Estate Photography?
Real estate photography is taking professional pictures of a property to sell and market it better. It is most commonly used for listing a property for sale online.
Why Real Estate Photography is Important?
Well-photographed photos grab the attention of a potential buyer and are more likely to get sold faster. The image below shows how a home listed with amateur photos vs professional photos looks. The picture with professional photography clearly looks better and stands out.
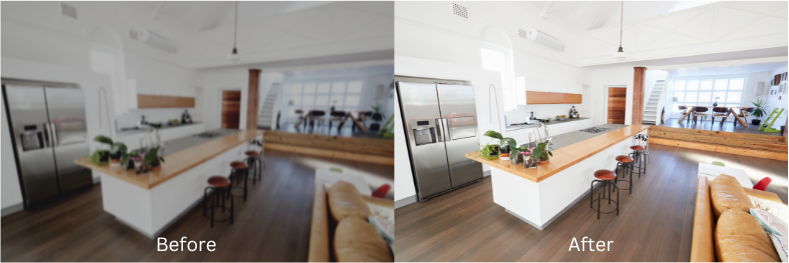
A real estate photographer will know the right angles, lighting, time of the day, and elements to focus on when taking photos of your house. Professionally photographed homes in the $400,000 range sold three weeks faster and for about $10,000 more relative to their list price, than homes with amateur photos.
Real Estate Photography Tips
📷 Real Estate Photography Tips
- Feel out the space before you start
- Declutter and groom
- Enhance the visual appeal through staging
- Keep a lot of natural light
- Turn on all the lights
- Shoot with a wide-angle lens
- Use a tripod
- Shoot with different angles
- Editing can do wonders
Step 1: Feel out the space
It is important to feel the space before you take photos. Find out the rooms that need more improvement or tidying up. Play with the different angles in your head. Or start visualizing which is the right angle to take the best shots. Find the special point of the room that stands out easily, and use it as your focal point.
Step 2: Declutter and groom
Before your photo session, clean the house thoroughly. Tidy up every nook and cranny, especially the corners. Camera flash can easily pick up dust due to light reflection. So, make sure your home is nice and neat.
Step 3: Consider staging the property
Staging is a great consideration if you are selling an expensive home. Staging can also help if your property has odd spaces, that a buyer would not be readily able to visualize. When a home staging is done correctly, that’s half the battle won.
If your property isn’t expensive or a luxury home, and it doesn’t have odd spaces, staging is mostly optional. You can also consider virtual staging, where photographs are enhanced to add furniture and accessories.
🛋️ Home Staging Tips: 7 essential tips to nail home staging!
Step 4: Keep a lot of natural light
When you’re ready to shoot, open all the doors and windows so sunlight comes through in your photos. Though artificial light from light fixtures can help, nothing beats natural light that gives off a natural look. Also, LED panels and reflectors can help enhance the natural light.
Step 5: Turn on all the lights
Photography is all about the right lighting. Natural lighting is your best option while taking pictures. However, when that is not the option, focus on artificial lights in the house. A bright, well-lit home will stand out. You’ll get more clicks and more interest.
Replace burnt-out light bulbs. Make sure all your lights work. And ensure that you use a strong flash in spaces that are devoid of natural light.
Step 6: Use a tripod
Ask any professional photographers, and they’ll always give you this tip. A tripod is an absolute must. It simplifies the shooting process. For places with low light, a solid tripod can be helpful to avoid the blurry effect. You can also get sharp-quality photos when you want to do a late-night photo session.
Step 7: Shoot with a wide-angle lens
Invest in a wide-angle lens to improve your listing shots. In real estate photography, most pro-level real estate professionals use wide-angle lenses to enlarge the room visually. This helps create a sense of depth and makes spaces bigger than they really are.
The usual real estate photography camera settings or requirements or specs 16-35mm (full-frame), 10-22mm, and 12-24mm (cropped sensor cameras). Also, you have to shoot in raw so you can edit the photos easily.
Step 8: Shoot with different angles
Find creative ways to make your photos look interesting. Pay attention to details. Avoid odd and trivial angles when you shoot. Homes come in different shapes, styles, and sizes. Seek the best perspective in the main rooms, especially in the dining area, living room, kitchen, and bedrooms. The key is to keep your camera angle at about chest height and shoot.
When the sunlight reaches the walls and floors, it makes the room more inviting and cozier.
Step 9: Editing can do wonders
Consider photo editing to finalize the shots. There are a bunch of applications or tools to adjust hue and saturation, or increase brightness. You can use Adobe Lightroom to edit the photos in one go with the same modifications.
There are available presets that you can choose from that can add depth and contrast to your photos in just a few clicks. In this way, you don’t have to waste your time editing your photos one by one. Crop sections that are not part of the photo. Adjust the white balance settings and make some vertical corrections.
Over-editing can be a turn-off. Make sure your photos don’t look too unnatural.
What to Avoid When Taking Photos
- No local point shots, or uneven and irregular framing.
- Blurred photos, overexposed, or underexposed images.
- Don’t include cars, people, or pets in the photos.
- Don’t take a shot of your room’s interior from the corner.
- Place away kitchen devices, toasters, blenders, etc, and keep the countertop clean.
- Remove personal items like photographs, clothing, boxes, and souvenirs from the house
- Don’t show your sponges, soaps, towels, toiletries, or other personal items.
- Make sure you put toilet seats and lids down.
Benefits of Good Listing Photos
- You’ll Win Clicks: Buyers are searching for their next home on housing portals like Zillow, Houzeo, and Realtor.com. Great photos make your listing stand out. You’ll get more clicks and more buyer interest.
- You’ll Increase Your Chances of Offers: More home buyer interest will drive more foot traffic to your property. More showings may translate to more offers! And more offers may result in a higher sale price. Photos can have that effect.
- You May Sell Faster: Great photos attract more buyer interest. That can reduce your days-on-market significantly. According to one study, professionally photographed homes sold 32% faster!
🕔 What is The Best Time To Take Real Estate Photos?
When is the right time to do your listing shots? Although this is debatable, most professionals agree to do it 1+hours after sunrise or 1+hours before sunset. That’s probably 7:00 am and after, or from 4:00 pm to 7:00 pm (the golden hour).
Daytime Photography
Most homes are best photographed during the day. The first rule of thumb is to pick a sunny or partly sunny day to make the photos bright and warm. If you only have a smartphone (although we highly recommend a high-quality DSLR camera), set the settings to HDR or high dynamic range to snapshot with sharp details.
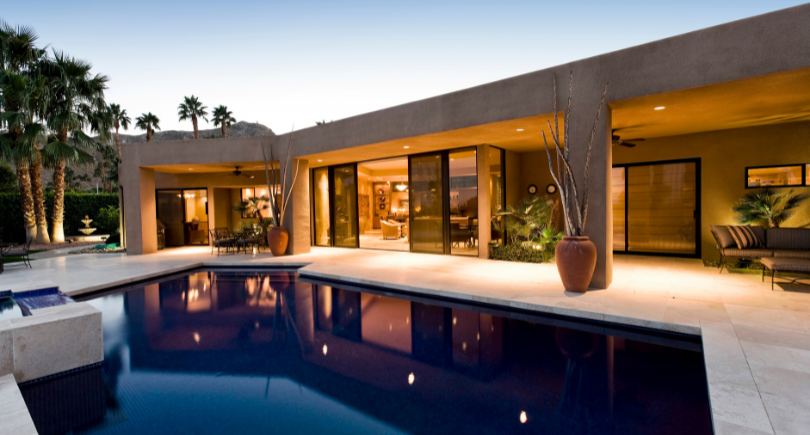
Twilight Photography
Twilight photography includes taking property photographs during the evening. Twilight photography is also referred to as dusk photography. Dusk real estate photography stands out from daylight photography because it is not that common. As per reports, 92% of buyers will look at twilight photos even if that is not what they are looking for.
This type of photography is best suited for properties with many outdoor areas like a large back and front yard, pool, and garden. Make sure the indoor lights are on to provide contrast.
Types of Real Estate Photography
🏘️ Based on Property Types
There are many different properties where photography is extensively used, i.e residential, commercial, architectural, and luxury spaces.
1. Residential Real Estate Photography
Residential photography includes photography of residential condos, single-family houses, apartments, and luxury properties. It also includes photographing the interior and exterior of the property. This type of photography is also used in home staging.
2. Commercial Real Estate Photography
Commercial photography includes commercial spaces like restaurants and business centers. They require more advanced equipment because they can be used for print magazines, commercial ads, news, and other media outlets.
3. Architectural Photography
Architectural photography is usually preferred by architects, contractors, and civil engineering firms. The photographer will highlight key architectural aspects of the property.
4. Luxury Real Estate Photography
Typically, residential properties above $1 million fall in the range of luxury real estate. Luxury photography focuses on storytelling through pictures and magazine-quality pictures.
👩💻 Based on Technology
Real estate photography uses various technologies to present the property from a different perspective.
5. 3D Real Estate Photography
3D photography includes photos, videos, and a 360-degree view of the property to give a virtual tour. Matterport technology is used which is a 3D camera that enables anyone to take a virtual walk through a property. It is mainly used when a property is under construction, for potential buyers
6. Real Estate Aerial Drone Photography
Aerial photography is commonly known as drone photography. A drone or aerial view of the property gives the buyer an idea about the surrounding area, amenities, and landscape. Drone photography is especially important if it is a large property and has a lake, scenic backyard, or a front yard.
📸 Based on Editing Techniques
Home-selling photos can also be enhanced through different editing techniques. A few of the commonly used techniques are mentioned below:
7. Flambient Real Estate Photography
The “flambient” method for photography combines both flash and ambient light in your shots. Pictures are taken using a flash and without a flash. This is done to eliminate shadows or overexposure and to give a balanced image in the end.
8. Blue Sky Real Estate Photography
Exterior background of the property can make or break the picture. A blue sky in the background enhances the picture vs a cloudy or gray sky dulls the picture. Blue sky photography technique replaces the dull sky with sky blue sky and makes the property photo appear cleaner and crisp.
9. Bracketing Real Estate Photography
Bracketing is a photography technique where a picture of the same shot is taken from different camera settings. This is done to avoid overexposure or shadows in a picture.
10. HDR Real Estate Photography
HDR (High Dynamic Range) technique produces the most true-to-life picture of the property. The photographer will take an over-exposed photo and an under-exposed photo along with a standard exposure. The three pictures are then merged together to give a well-lighted image of each part of the room. HDR photography is the best way for the camera to show what the human eye naturally sees.
💵 Real Estate Photography Pricing
Real estate photography pricing is determined based on time, per square feet area of the property, and the number of photos to be required. Based on these factors, a photographer or photography company will charge you for their photography services.
The photography pricing will also depend on the location of the property. Like, Los Angeles’s real estate photographer prices are 45% above the US national average.
Why Do You Need a Real Estate Photographer?
A professional real estate photographer knows how to capture your property and make it more appealing once listed online. It could be an MLS, flyer, or a picture for the yard sign, getting a real estate photographer is a must. Your property will sell quickly and at a higher price if make a listing with professionally photographed pictures.
But would you hire a professional to take your listing photos?
If you don’t have enough time to research and do all the mentioned above tips, you need to hire a real estate photographer. These are experts in real estate photography and can manage to take great shots with the expected stellar outcome.
Most buyers glance at photos for a second and then look for another. Make sure yours will stand out among the rest of the photos. Feature the best shot so buyers will immediately want to see in-person of your property.
Final Note
Most buyers glance at photos for a second and then look for another. Make sure yours will stand out among the rest of the photos. With our guide on the best real estate photography, you can now feature the best shots, so buyers will immediately want to see your property and close the deal.
Real Estate Photography Near Me
Frequently Asked Questions
1. What are some tips for real estate photography?
Tips for real estate photography:
1. Examine the property
2. Declutter and groom
3. Enhance the visual appeal through staging
4. Turn on all the home lights
5. Use a tripod
6. Shoot with wide lens
7. Keep a lot of natural light
8. Shoot with different angles
9. Editing can do wonders
2. Do real estate agents pay for photography?
Yes. If you have hired a Real estate agent or Realtor, they most often pay for the photographer.
However, it is not a set rule. If you are selling your home via "For Sale By Owner" route, where no agent is involved, you should find a photography company or photography and pay.
3. What equipment do I need for real estate photography?
The basic equipment required for real estate photography:
1. DSLR camera
2. Wide-angle lens
3. Tripod
4. Remote trigger
5. Flash and Flash trigger
6. Light Modifiers
7. Light Stands
Also Read
Real Estate Photographers in USA: Find out the top real estate photographers in the US and make your listing pictures stand out
Best Home Staging Companies: Staged homes see $400 above the listing price. To help you maximize your profits we have compiled a list of the best home staging companies in the USA
Best Real Estate Websites: When selling or buying a home, you need the best real estate platforms to list or sell your property. Read our reviews of the best real estate websites in America.
How to Flip a House: House flipping is profitable if done correctly. Read our comprehensive guide on how to flip a house to know more.
Related Keywords: real estate photography tips, property photography, best camera for real estate photography, real estate photography pricing, drones for real estate photography, photography for real estate, photography real estate pricing, 3d real estate photography, 3d real estate photography, drone photography real estate, drone real estate photography pricing, luxury real estate photography, drone photography for real estate
Related: real estate photography rates, real estate photography services, tips for real estate photography, 360 real estate photography, aerial real estate photography, pricing for real estate photography, real estate photography websites, twilight real estate photography, commercial real estate photography pricing, drone photography in real estate, drone real estate photography cost, drone real estate photography near me, how much does real estate photography cost, professional real estate photography near me


.webp)
